Showing posts with label easy. Show all posts

Sunday, January 22, 2017

Dutch Baby Pancakes

I made this for breakfast this morning and you should too.  My whole family practically applauded when I took this out of the oven and it was demolished within a couple of minutes.  Even my husband who is generally not a fan of sweet things was impressed. Not only was it delicious, it was stupidly easy to make.  Whip up the batter in a couple of minutes, throw it in the oven, and 20 minutes later, you are eating heaven.

At the breakfast table, we pondered the name of this dish. After a quick google search,  what it comes down to is that it has more or less nothing to do with the Dutch or babies.  It seems to have been dubbed this name by an American restaurant and the name stuck. However, it is really just a big popover, which is in turn a slightly sweetened Yorkshire pudding.

I was inspired to make this today because suddenly I kept seeing recipes for it everywhere.  Smitten Kitchen did this version in chocolate.  The Guardian had this lemony version.  My recipe is loosely based on this version.  The differences are mainly in the amount of eggs and the flavorings.  I went for a 3 egg version.  Lots of recipes have you rest the batter, but that requires more planning than I can manage and with no evidence at all, I doubt that it makes any significant difference.  Having said that, if you are the organized sort, it seems obvious that you could whip up the batter the night before, which means that in the morning you could just heat the oven and dump the batter in.  It won't save you much time since you still have to heat up the oven, but it does mean that if your brain is not yet functioning without your cup of coffee, you won't mess up with the measurements.

Eat this with whatever pancake accompaniments you might like.  I personally prefer powdered sugar and lemon.  Any kind of berries thrown on top would be delicious.  Jam and/or maple syrup are also obvious candidates.

Recipe feeds 2 to 4 persons.

Batter:
3 large eggs
2/3 cup milk
2/3 cup flour
1/3 cup sugar
pinch salt
1/2 teaspoon cinnamon
1/2 teaspoon nutmeg
1 teaspoon vanilla

For the pan:
50 grams (1/4 cup) butter

Pre-heat your oven to 210C or 450F.  Put a medium cast iron pan or oven proof dish in the middle of the oven while it preheats.  In a large bowl, whisk up all the batter ingredients, until smooth.  It can have a few small lumps of flour.

When the oven is heated, open the oven door and plop the butter in the hot pan.  Close the door and let the butter melt.  When it is melted, open the door and pull out the rack so that you have better access to the pan and swish around the butter so that it covers the bottom and sides of the pan.  Pour the batter in the pan.  Push the rack back in and close the oven door.  Bake the pancake for 18 to 25 minutes until the sides have risen high, the middle is puffy, and the whole thing is golden brown and your mouth is watering.

Right before it is ready, gather your eaters around the table.  Whisk the hot pan from the oven onto a trivet on the table.  Let everyone ooh and aah.  Take a bow.  Civilized people might cut it into pieces but my family just tore off pieces with their hands.  Sprinkle with lemon and powdered sugar or your preferred topping and devour.


Monday, October 03, 2016

Mozerella with Roasted Tomatoes and Avocado


This lovely salad is a caprese salad for when the tomatoes you have are a bit less than amazing, which in Sweden more or less means all the time.

Slicing the tomatoes and letting them grill in the oven intensifies their sweet flavor. Sometimes, I grill tomatoes like this as an accompaniment to steak or other grilled meat. This makes a perfect starter, or even main course for a light lunch or dinner.

Serves 6 as a starter

8 to 10 medium sized tomatoes
one onion
olive oil
salt and pepper

375 grams fresh mozzarella
1 ripe avocado
balsamic vinegar

Put your oven on its highest grill setting. Slice the tomatoes and lay on a baking tray.  Slice the onion in wedges and throw those in. Drizzle with olive oil and sprinkle with salt and pepper.  If the tomatoes are particularly unflavorful, you can even sprinkle on a bit of sugar.  Spread the tomato and onion out in an even single layer. Grill the tomatoes for 15 to 25 minutes until they have charred edges.  Let them cool to room temperature.

When you are ready to eat, slice the mozzarella and lay the slices out on a serving platter.  Peel and slice the avocado into wedges and lay them on top of the cheese and arrange around the platter.  Sprinkle a bit of salt onto the avocado slices. Heap the grilled tomato and onion in the middle of the platter.  Sprinkle the whole thing with a bit more olive oil, drizzle with balsamic vinegar and grind some fresh pepper over it.  Serve with some crusty bread to mop up the juices.


Thursday, August 11, 2016

Plättar (Little Swedish Pancakes)

Earlier this year I discovered an iron pan with seven round shallow depressions in my father-in-law's cupboard, a plättjärn.  I love old fashioned Swedish cooking, so I immediately started looking up recipes for little pancakes.  Of course, my beloved Mannerström came up trumps.  He had a perfect recipe.  
These little pancakes are extremely tender and delicate, with a lovely slightly crispy exterior.  Do cook these on a cast iron pan.  If you try to cook them on a regular pan, the pan will not get hot enough to make the lovely exterior.  


In Sweden, these would be dessert, not breakfast.  I like them for both dessert and breakfast.  My friend Aiai and I made these pancakes this summer and the kids lined up.  They are served with whipped cream and jam.

Serves 3 to 4

3 eggs
1.5 dl flour
2 dl cream
1 dl water
50 grams butter
1 tablespoon sugar
a pinch of salt


Melt the butter in the microwave or in a small pot on the stove.  Set aside to cool.  In a medium bowl, beat the 3 eggs.  Add the flour and sitr until mixed.  Add the cream water, sugar and salt and stir until you have a smooth batter.  Add the butter and stir until the butter is fully incorporated into the batter.

Heat a cast iron pan on medium heat, preferably a Swedish plättjärn.  Melt a little butter onto the pan and pour in enough batter to just fill the pancake depressions.  Alternatively, you can make little pancakes using about a tablespoon of batter.  Cook until golden brown and then flip and cook on the other side.  Serve with jam and whipped cream.

Monday, August 08, 2016

Falkenberg Cakes (Falkenbergare)


There is an amazing bakery called Stålbloms down near my summer house on the west coast of Sweden.  All of their cakes are gorgeous and delicious.  Their Princess Cake is divine. They make the best Semlor that I have ever tasted, a cardamom flavored bun that is filled with marzipan and whipped cream and only served during the Spring.  It always amazes me that this bakery, in a little town in the countryside, rivals the best bakeries in Stockholm.

While all of their cakes are memorable, there is one that I dream about. It is an unassuming plain little cake topped with a glaze and sprinkling of candied orange peel.  Even if I am tempted by one of the more glorious looking cakes to eat for my fika, which I love to take in their pretty garden, I buy one of these to take home with me and eat slowly while gazing out at the sea.
They call these cakes Falkenbergare, after the name of the town Falkenberg, where Stålbloms was founded.  These cakes are sticky and dense, almost custardy.  They are rich but not cloying.  The combination of almond and orange is delectable.  I have googled the name of this cake several times and I have kept an eye out for these cakes at every bakery that I visit.  But I have never found a mention of them on the internet or seen them at any other bakery.

This summer, I was excited to notice that they had a cookbook for sale.  I eagerly looked through it to see if they had published a recipe for my beloved cake...and YES!  So, now I can have these wonderful cakes any time I like, and so can you.  Here is the recipe, slightly modified from the original:

Makes about 15 cakes

Cake:
250 grams butter at room temperature
500 grams marzipan (mandelmassa)*
1 tablespoon potato flour or cornstarch
5 eggs

Glaze:
About 4 dl powdered sugar
Zest of one orange
Juice of about half an orange
Candied orange peel, to garnish


Preheat the oven to 190C (375F). Butter a muffin pan or other small cake forms. Grate the marzipan to make it easier to incorporate into the butter. Put the marzipan and butter into a large bowl and mix with an electric mixer until it is well mixed and creamy.

Add in the potato flour (or cornstarch) and the eggs, one at a time, mixing until each egg is well incorporated. The batter will become lighter and fluffy with each additional egg, but still be very thick.

Divide the cake batter into the muffin tin or forms, filling each form almost full. Bake in the oven for 12 to 15 minutes until browned on top and a toothpick comes out clean.  Take the cakes out of the oven and let cool.


While the cakes bake, you can make the glaze.  Put the powdered sugar in a bowl with the orange zest.  Add in some orange juice, a few drops at a time and stir until the glaze feels thick enough to spread easily but not so thin as to be drippy.

When the cakes are cool, unmold them and top each cake with a spoonful of the glaze and spread the glaze around the top.  Sprinkle some candied orange peel on top of each cake.  Eat reflectively and slowly, preferably while staring out at the sea.


* This cake calls for a marzipan that is 50/50 sugar and almonds.  In Sweden, this mixture is called mandelmassa or almond paste.  Marzipan in Sweden is more sugar than almonds about 60/40.


Friday, August 05, 2016

Kladdkaka “Sticky Cake”

This cake is a Swedish classic and it can be found in most cafés, is served frequently for dessert at parties, and a quick version can be found in the freezer section of the grocery store.  It is very similar to an American brownie in texture, being slightly sticky in the center.  Like a brownie, it can easily be overcooked, in which case it will be a more ordinary chocolate cake, still delicious, but not a kladdkaka!  This version is from Lelia Lindholm, a Swedish baker, whose cookbook is one of my favorites. It is a simple recipe and is the best version of this cake that I have tasted.

It is so simple, that have relinquished the baking of this cake to my son Oscar.  Oscar and his friend Konrad whipped up the batch in these photos and had a great time doing it.

50 grams butter
½ deciliter cooking oil
2 eggs
2 deciliters sugar
1 deciliter granulated brown sugar (raw sugar)
2.5 deciliters flour
4 teaspoons cocoa powder
2 teaspoons baking powder
1 teaspoon vanilla (or vanilla sugar)
1 pinch salt
50 grams dark chocolate  (use a good eating chocolate here)

Get into all the nooks and crannies when buttering the pan.
Put the butter in a bowl and melt it in the microwave, usually about one minute.  When the butter is melted, mix with the cooking oil, and set aside
In another bowl, beat the eggs, and two types of sugar until the mixture is light and fluffy.  Stir in the butter and oil mixture.  Add the flour, baking powder,cocoa powder, vanilla, and salt and stir the batter until well incorporated.

This recipe makes one cake but the boys doubled it.
Pour the mixture into the prepared cake pan.  Chop the dark chocolate into small pieces and sprinkle over the cake batter.

Bake the cake for about 30 minutes.  When testing the cake, it should be still sticky in the center.  The cake will puff up, but then as it cools it will fall in the middle.  This is totally normal, so don't freak out.


Serve with whipped cream.

Tuesday, August 02, 2016

Juniper Smoked Scallops

This seems to be the summer when I write about Fäviken, the famous restaurant near Åre in Sweden, even though my one meal there was a couple of years ago.  I just posted the recipe for a meadowsweet cordial that was inspired by Fäviken, and now this. Among the many memorable dishes were the fattest scallops that I have ever seen, served in its shell.  The waitor informed us that they were fresh from Norway, which is less than 50km away.  The next summer after we ate at Fäviken, there were fresh scallops in their shells at the fishmonger.  They were expensive, but we had to try to recreate this dish, or to be more precise, Peter had to recreate the dish, grilling and seafood being part of his manly terrain.

It has become an annual ritual of summer for us to eat these scallops, whenever we can get scallops on the shell at the market, which is not that often.  I had thought about putting it on my blog, but cleaning the scallops is time consuming and a bit much for your average cook, and, in fact, I have never done it, only watched Peter.  This year, Gustaf requested these scallops for his birthday dinner.  We were unable to get the scallops on the shell, so we decided to try make the dish using frozen scallops.  The result was splendid, cheaper, and so so easy.  Now, Faiviken's version, as I recall, was delicate, with just a smidge of butter, and a whisper of smoke.  Peter's version is more. More butter, more smoke.  And I think it is even better than the original.

The dish just requires three ingredients: scallops, butter, and juniper.  Somehow, when the scallops meet the butter and both are infused with the aromatic smoke from the juniper, the results are much much greater than you would believe.  The buttery juices are delectable and must be soaked up in lots of crusty bread or a spoon, if you are greedy.

This recipe is more of a method than an exact science.

Gather an armful of juniper.  This is a common plant, so you probably have a juniper tree growing near you somewhere.  You can identify them by their blueish purple berries which can be picked and used to flavor wild game dishes, a commong flavoring here in Sweden.

Allow 2 to 3 large scallops per person, for a starter, more if you are serving these as your main course.  You can use fresh or frozen, the largest that you can find.  I found mine at the local ICA store in the frozen section, about 30 scallops in one bag.  If you are in the USA, Costco has excellent frozen scallops and I recomend those unless you have a really good trusted fishmonger.

Light an outdoor grill with charcoal.  While the coals are heating, you can prepare the scallops. Get ready copious amounts of butter.

Find a cast iron pan or something that will take the heat of a grill and has some edges to capture the juice. We used a Swedish pancake pan, which has convenient depressions. On a cast iron pan, arrange large splodges of butter--more than you think necessary.  Then double that amount.  Lay the mussels on top of the butter.

When the grill is hot, throw the juniper onto it.  It will start smoking immediately. Alot of smoke. Put the rack down and then put the pan with the mussels on top.  Put the lid on the grill.  Let the mussels cook for a couple of minutes until the butter is melted and slightly bubbling. The mussels will taken on some color from the smoke.


Serve immediately, spooning the juices over the scallops with lots of crusty bread to soak up the flavored buttery juices.  Don't be shy about dipping your bread into any juices that might remain in the pan.  Try not to fight over it.


Monday, July 18, 2016

Gooseberry Fool with Pistachio Meringues

Browsing the shelves in the supermarket when I first moved to London for grad school, I was entranced by all the names of things unfamiliar: crumpets, double cream, golden syrup, scotch eggs, tinned rice pudding, hot cross buns...I wanted to try it all.  My gaze landed upon a little carton that looked like it might be yogurt.  It said "Gooseberry Fool."  What in the world was a fool?  What was a gooseberry?  I had to know.  Turns out a fool is bit of fluffy dessert goodness that melts in your mouth, creamy and tangy. I still wasn't sure what a gooseberry was, but I assumed it was, well, some kind of berry.

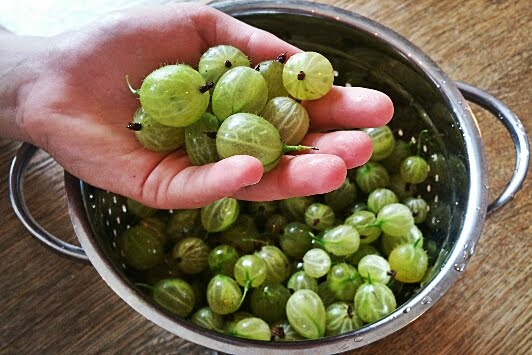
Fast forward a few years (ahem, many years) later, when we first bought our summer house here in Sweden.  Peter pounced upon a unassuming looking bush with glee!  "Great," he said, plucking some kind of fruit that looked like a strange veiny green marble. He popped it in his mouth and said, "Mmmmm...gooseberries are my favorite."  Aha!  So that is the elusive gooseberry.  Gustaf is also a big fan of the gooseberry and so all of our small crop is eaten every summer straight off the bush.

This summer, Gustaf said to me, "I found a big gooseberry bush.  It has big gooserries.  A lot of them."  I said, "show me."  We went to the bush.  This was a huge gooseberry bush.  The father of gooseberry bushes.  It was sporting the most enormous gooseberries that I had ever seen.  A few coming close to the size of a ping pong ball.  It was beautiful.  But there was a catch. Technically, it seemed to be in a field that belonged to noone.  But it was very near our neighbor's house.  And the only reason why it had been exposed is because the neighbor had mowed a path through the field from their house to the road.  Gustaf and I debated.  Can we take the berries?  We decided to keep an eye on them.  Once they were ripe, we would see if the neighbors picked them.  Last week, Gustaf reported in, "No one is picking the gooseberries."  Something had to be done.  I decided to take the initiative.  I walked up the path and went right up to my neighbor, Anna, who was standing on the porch and asked her whether she wanted the gooseberries.  She said that only her husband liked them and that we should take as much as we wanted!  Bingo!  She even lifted up the branches to help me pick. Thanks Anna!

I knew immediately what I wanted to make.  A fool.  This is a dessert with a long pedigree going back the 1500s.  Older recipes show it as a type of custard infused with fruit.  The modern recipe is a fruit puree folded into whipped cream.  Gooseberry is the classic fruit.  Its tart sweetness keeps the dessert from being cloying.

I decided to make some meringues to go with it, to add some texture and crunch.  I sprinkled the meringues with pistachio, mainly for the pretty green color which would echo the gooseberry.
This is how I did it.

For the meringues:
(Makes about 9 meringues)
4 egg whites
about a cup sugar
1 teaspoon vanilla
small handful pistachios, chopped finely

Beat the eggwhites on the highest speed until they form stiff peaks that do not fall down when you lift up the beaters.  Add the vanilla and then gradually add in the sugar.  Beat for a few minutes until the grains of sugar dissolve and become almost unnoticable in the eggwhites. The egg whites will become thick and glossy.

Preheat the oven to 100C.  On a baking sheet lined with parchment paper, divide the eggwhite mixture into 9 circle shaped balls.  Use a spoon to create some nice swirls in each pile and to pat the pile into a nice rounded shape.  Sprinkle the pistachio over each meringue. Bake in the oven for an hour to an hour and a half.  If you want them very dry, when they are done, turn off the heat and let them sit in the oven until it cools.  You can do this the night before and leave them in the oven overnight.

For the gooseberry fool:
(serves 6 to 8)
about 500 grams of fresh gooseberries
6 tablespoons sugar
300 ml Greek yogurt
300 ml whipping cream
one teaspoon vanilla
2 tablespoons powdered sugar

Make a gooseberry compote by putting the fresh gooseberries (topped and tailed) into a small pot on a medium high heat.  Add the sugar and stir.  Bring to a boil and cook about 10 minutes, stirring occassionally.  The gooseberries will pop and break down, but still have some chunks.  Taste and add more sugar if the gooseberries are very sour.  Set aside and let cool.  The compote will thicken as it cools.

When you are ready to serve, whip the cream to soft peaks. Add the powdered sugar, vanilla and yogurt.  Whisk together.  Taste to check the sugar.  It should just be barely sweet.

Take a bit more than half of the gooseberry compote and stir it into the cream and yogurt mixture.  Taste and add more compote, if desired.

To serve, pile a serving of the fool into a bowl.  Drizzle with the a spoonful of plain gooseberry compote and serve with a meringue.

If you have any compote leftover, it tastes lovely drizzled on some yogurt and topped with granola for breakfast or as a topping for pancakes or waffles.


Monday, June 27, 2016

Swedish Oatmeal Cookies (Havrekakor)

This is a family favorite and a quintessential Swedish cookie.  They have become a specialty of my son Oscar who made his first pocket money by baking a few batches, packing them into little bags and selling them around the neighborhood on his bicycle.
They are simple to make and irresistible, being neither too rich nor too sweet.  Unlike American oatmeal cookies, these are light and crunchy.  A batch of these cookies are easily eaten in a day, okay, in an hour, by my family!

About 40 small cookies

250 grams butter
3 dl sugar
1 egg
2 teaspoons baking powder
1 ½ dl oatmeal
2 dl raisins
5 dl flour


Heat the oven to 200 C or 400F .  
Cream the butter in a large bowl with an electric mixer until it is light and fluffy.  Add the eggs and the baking powder and continue to mix a further two minutes.  Add in the flour and sugar bit by bit until it is just combined.  Finally, add the raisins and oatmeal and combine with a wooden spoon. 

Line a baking sheet with parchment paper and measure out heaping teaspoons of dough, leaving about 2 inches between each cookie to allow them to spread.  Bake in the oven for about 8 minutes until golden.

Wednesday, June 22, 2016

Yotam Ottolenghi's Amazing Hummus

If you have not taken a look at Yotam Ottolenghi's Jerusalem cookbook, I highly reccomend that you do. Ottolenghi is a Israeli chef who has several restaurants in London.  His gorgeous cookbook is full of beautiful vibrant salads, vegetables and other amazing dishes that I want to eat every day.  I have been making his hummus and it is by far the best hummus that I have ever tasted. It is silky smooth, light and fluffy, with a gorgeous balance of chickpea flavor and tahini, tempered by a bit of lemon juice and garlic.

I like to eat it on the day that I make it warm, topped with fried bits of lamb. The leftover hummus is great the next day, cold smeared onto bread or slices of cucumber, carrot and celery.

There are two tricks that make this hummus great.  The first is that the chickpeas are cooked with a bit of baking soda.  The baking soda allows the chickpeas to cook a bit faster, but more importantly breaks down the outside shell of the chickpea.   The second trick is slightly overcook the chickpeas until they mush easily between your two fingers. Doing this results in a super smooth, silky and almost fluffy texture.  Trust me, when I say that you have never had hummus this good!

This recipe is for a purist hummus with just garlic, tahini and lemon juice as a flavoring.  You can jazz it up by adding some cumin or adding more tahini to taste.

Ottolenghi's Hummus, as interpreted by me

250 grams dried chickpeas
1 teaspoon baking soda
3/4 to 1 cup tahini
4 tablespoons lemon juice (about a half of a large juicy lemon)
4 garlic cloves, peeled
1 teaspoon salt
6 tablespoons ice cold water

The night before you want to make the hummus, put the dried chickpeas in a bowl and cover with plenty of water and let the beans soak over night.

The next day, drain the chickpeas. Put a large pot on the stove on high heat.  Pour in the drained chickpeas and the baking soda.  Stir for about 3 minutes.  You will see that skins of the chickpeas start to disintegrate a bit and a film will form on the bottom of the pot.  Pour in 1.5 liters water and bring to a boil. Skim off the foam periodically. Cook the chickpeas for 20 to 30 minutes until they are very tender and can be mushed easily between two fingers.  Drain the peas.

Pour the chickpeas into a food processor and process until the peas are smooth.  Add in the tahini, salt, lemon juice, and the garlic (pressed through a garlic press).  Process until combined.  Taste teh hummus and adjust the salt and tahini to your liking. With the motor on, add the cold water, one tablespoon at a time.

Serve warm or cold with a drizzle of olive oil and a sprinkle of zatar spice, which adds a lemony bite as well as a gorgeous red color.  Some toasted pine nuts also taste wonderful on top.

I like to serve it as dinner with bits of lamb on top to smear over pita or a flat bread:

500 grams boneless lamb chop
1 teaspoon cumin
juice of 1/2 lemon
1/4 teaspoon salt
1/4 teaspoon peppar
chopped parsley
a sprinkle of zatar
olive oil for frying

Cut the lamb into small bite size pieces.  Sprinkle with the salt, cumin, peppar and lemon juice.

Put a frying pan on the stove, preferably cast iron, onto the hottest heat.  Add a generous dollop of olive oil.  Fry the lamb, in two or three batches, until it is nicely browned, a few minutes on each side.

To serve, smear a generous amount of hummus on a platter.  Heap the lamb in the center, sprinkle with parsley, a drizzle of olive oil, a squeeze of lemon, and dust it with the zatar.

Serve with sliced cucumber and flat bread.

Tuesday, December 08, 2015

Salmon with Creamed Leeks and Cabbage

Leeks and cabbage are the unsung heros of the vegetable world. Cabbage normally gets lumped into the smelly and disgusting vegetable category, and leeks are known mainly for the elegant vichysoisse cold soup and ignored the rest of the time.  This is a shame because both vegetables are really tasty.  Leeks have a lovely sweet flavor.  I often just saute them quickly in a bit of butter and then add a tiny bit of water and cook until the leeks is tender.  The leeks make a lovely side dish to chicken or fish. Cabbage can be mild and sweet or slightly spicy, depending on the type.  A quickly sauted cabbage also makes a great side dish, and just needs salt and pepper as a seasoning.

In this dish I combine the two, and add a bit of cream for lusciousness.  It is quick and easy to make and makes a tempting base for a piece of fish. A little chopped almonds gives a bit of crunch and textural contrast.

I have chosen salmon but any fish would taste good here, or even chicken.  Cod would be especially delicious and I probably would have chosen it, but they didn't have any at the store yesterday!  A fresh fillet of salmon is a delicious thing but if it is not fresh, it can have a strong "fishy" flavor that I do not like.  I always ask when I buy the fish if it was delivered that day.  If it was not, then I don't buy it.  However, you never know if they are telling you the truth, so what I really recomend is finding a fishmonger that you like and going to them often.  If you are a good customer, they will let you know what is really fresh. Here in Sweden, I often buy Salmalax, which is a brand that advertises that they process the fish within 4 hours from catching.  You can find it in many of the regular grocery stores. It is a bit more expensive, but it does give perfect results, every time.


Serves 4
4 skinless fillets of salmon
3 medium to large leeks
1/2 head of a smallish cabbage
3/4 cup cream
handful of roasted and salted almonds
salt and pepper
a bit of butter for frying the fish


First prepare your vegetables.  Cut the cabbage into quarters.  Cut out the core.  Slice thinly crosswise.  Cut off the ends of the leeks. Cut in half lengthwise.  Wash the leaves carefully to remove any dirt and grit that might have lodged there.  Slice crosswise.Take the almonds and roughly chop.  Set aside.

Put a pot on the stove on high heat and pour in 1/2 cup of cream. Add in the leeks and cabbage, a half teaspoon of salt and some freshly ground pepper.  Put the lid on the pot and bring the cream to a boil.  Once it comes to a boil, turn the heat to low, give the vegetables a good stir, and put the heat back on.  Let cook for a few minutes, until the vegetables are tender.  Pour in the remaining 1/4 cup cream and give a good stir.  Put the lid back on and take off the stove.  It can sit while you cook the salmon.

While you are waiting for the leeks and cabbage to get tender, prepare the fish.  Salt and pepper each fillet.  Heat a frying pan on high, with a knob of butter.  Put the fish into the pan and cook for a couple of minutes until it is nicely golden brown.  Flip the fish over and cook on the other side, until that side is nicely golden brown.  The fish is cooked through when you see it begin to "break" in the middle of the fillet where the spine of the fish was.

Give the creamed cabbage and leeks a stir, then spoon a nice helping onto each plate.  Top with a salmon fillet and sprinkle with some of the roasted almonds.  Enjoy!