Tuesday, August 02, 2016

Juniper Smoked Scallops

This seems to be the summer when I write about Fäviken, the famous restaurant near Åre in Sweden, even though my one meal there was a couple of years ago.  I just posted the recipe for a meadowsweet cordial that was inspired by Fäviken, and now this. Among the many memorable dishes were the fattest scallops that I have ever seen, served in its shell.  The waitor informed us that they were fresh from Norway, which is less than 50km away.  The next summer after we ate at Fäviken, there were fresh scallops in their shells at the fishmonger.  They were expensive, but we had to try to recreate this dish, or to be more precise, Peter had to recreate the dish, grilling and seafood being part of his manly terrain.

It has become an annual ritual of summer for us to eat these scallops, whenever we can get scallops on the shell at the market, which is not that often.  I had thought about putting it on my blog, but cleaning the scallops is time consuming and a bit much for your average cook, and, in fact, I have never done it, only watched Peter.  This year, Gustaf requested these scallops for his birthday dinner.  We were unable to get the scallops on the shell, so we decided to try make the dish using frozen scallops.  The result was splendid, cheaper, and so so easy.  Now, Faiviken's version, as I recall, was delicate, with just a smidge of butter, and a whisper of smoke.  Peter's version is more. More butter, more smoke.  And I think it is even better than the original.

The dish just requires three ingredients: scallops, butter, and juniper.  Somehow, when the scallops meet the butter and both are infused with the aromatic smoke from the juniper, the results are much much greater than you would believe.  The buttery juices are delectable and must be soaked up in lots of crusty bread or a spoon, if you are greedy.

This recipe is more of a method than an exact science.

Gather an armful of juniper.  This is a common plant, so you probably have a juniper tree growing near you somewhere.  You can identify them by their blueish purple berries which can be picked and used to flavor wild game dishes, a commong flavoring here in Sweden.

Allow 2 to 3 large scallops per person, for a starter, more if you are serving these as your main course.  You can use fresh or frozen, the largest that you can find.  I found mine at the local ICA store in the frozen section, about 30 scallops in one bag.  If you are in the USA, Costco has excellent frozen scallops and I recomend those unless you have a really good trusted fishmonger.

Light an outdoor grill with charcoal.  While the coals are heating, you can prepare the scallops. Get ready copious amounts of butter.

Find a cast iron pan or something that will take the heat of a grill and has some edges to capture the juice. We used a Swedish pancake pan, which has convenient depressions. On a cast iron pan, arrange large splodges of butter--more than you think necessary.  Then double that amount.  Lay the mussels on top of the butter.

When the grill is hot, throw the juniper onto it.  It will start smoking immediately. Alot of smoke. Put the rack down and then put the pan with the mussels on top.  Put the lid on the grill.  Let the mussels cook for a couple of minutes until the butter is melted and slightly bubbling. The mussels will taken on some color from the smoke.


Serve immediately, spooning the juices over the scallops with lots of crusty bread to soak up the flavored buttery juices.  Don't be shy about dipping your bread into any juices that might remain in the pan.  Try not to fight over it.


Monday, August 01, 2016

Rhubarb and Red Currant Pie with a Lattice Crust

My son Gustaf is a big pie lover.  He loves it so much that he has pie every year for his birthday instead of cake. Rhubarb is one of his favorites, which is lucky since it is in season during his birthday.  At our summer house, I have planted a rhubarb on a sunny hillside where it basically grows without any care from me.  Every now and then I think about weeding it and then usually decide to do something else.  Depending on the kind of rhubarb you have, the pie filling can turn out to be a greenish shade.  To tip the filling over to red, it is traditional to add strawberries.  This year, I decided to add red currants, which I have in the garden.  This turned out to be an inspired choice because the red currants do not overpower the rhubarb flavor and they give a spectacular color. They also contain a lot of pectin which helps the filling set.

Because I made this as a birthday pie, I decided to use a lattice crust, to give it an extra special feeling.  I think you will agree, that the lattice looks gorgeous with the red fruit filling peeking through.  It is actually very easy to make a lattice crust with this method, which I show in photographs, although of course it does take more time.  I got this method from the amazing Pie by Ken Haedrick.  I highly reccomend this book if you are interested in pie.


Classic all butter pie crust 
(2 crusts)
3 cups flour (350 grams)
1 tablespoon sugar
½ teaspoon salt
1 cup (2 sticks/225 grams) cold butter, cut into small pieces
½ cup (8 tablespoons) cold water

With a food processor:
Put the flour, sugar and salt into a food processor and pulse several times to mix.  Add half of the butter to the mixture and pulse 6 or so times.  Fluff up the mixture with a fork, making sure to get all around the sides.  Add the rest of the butter and pulse again about 6 times.  Fluff with a fork again.  Add about half of the water and pulse 6 times.  Fluff again.  Add the final half of the water and pulse 6 times.  When it is ready, it will be starting to form some clumps.  Don’t let it completely form a big ball, because you will over process it.  You want the butter to be in tiny pieces, not completely amalgamated.  It is the process of the butter melting and steam forming in the dough that makes the pie dough flakey.
Turn the dough out into a big bowl and knead once or twice, just so the dough comes together in a big ball.  Divide the mixture into two even sized balls.  Wrap each ball in plastic wrap, flattening them out while you wrap.  Put the balls in the refrigerator for at least one hour.  You can also freeze the dough now, if you want to save it for a later use. 

By hand:
If you do not have a word processor, you can do it by hand.  After adding the butter and shortening, use your fingers to smear the butter into the flour.  After a bit, you will find the mixture resembling a coarse crumble.  Try to work it quickly so that the butter doesn’t melt and don’t overwork the dough.  It should not be smooth and even, but have little blotches of butter in it. Add the water and mix the dough, kneading it a few times, just enough so that the dough holds together and can form a ball. Divide the mixture into two even sized balls.  Wrap each ball in plastic wrap, flattening them out while you wrap.  Put the balls in the refrigerator for at least one hour.  You can also freeze the dough now, if you want to save it for a later use. 

Rolling the crust:
Take the ball of dough out of the refrigerator about 15 minutes before you want to use it to let it warm up a little bit. On a floured pastry cloth or floured piece of wax paper, roll out one of the pieces of dough, large enough to fit your pie pan.  Because the dough is cold, it will have a tendency to crack, so don't roll with too much pressure at the beginning.  If the dough is not yet malleable enough to roll, just leave out for another 10 minutes and try again.

Roll the dough over your rolling pin and lift it onto your pan.  Smooth the dough out into the pan, leaving the excess dough hanging over the edge of the pan.  Stick the prepared crust into the freezer while you prepare the filling.  Freezing the crust helps it from getting soggy in the beginning of the baking and also helps to protect the crust when you are putting the filling.

Rhubarg and Red Currant Filling:
about 700 grams of rhubarb (3 to 4 large stalks)
about 150 grams red currants (about a cup)
about 325 grams sugar (1 1/2 cup)
a teaspoon ground cardamum
a teaspoon ground cinnamon
a pinch of salt
5 tablespoons flour


Cut the rhubarb in half lengthwise or in quarters if the stalk is very thick.  Chop into dice about one centimeter wide.  Pour into a large bowl.  Add the red currants, sugar, salt and spices.  Stir until all the fruit is covered evenly with the sugar mixture.  Taste a piece of fruit. If you think it is too sour, add a bit more sugar.  Add in the flour and stir again until the flour is evenly mixed in.


Preparing the pie:
Preheat the oven to 400F(200C).  Take the crust out of the freezer and pour in the filling.

Roll out the second crust and slice into 8 even strips, about 2.5 to 3 cm wide. These will form your lattice.


1) Lay the longest strip in the center of the pie and then arrange two shorter pieces on either side, for a total of five strips.  In this picture, I forgot the middle strip and had to move my strips over to get a fifth strip in, which you will see in the next picture.


2) Pull back the two strips on either side of the center to a bit more than half way.  Lay another long strip in the center, perpendicular.  Fold the two strips back down.


3) Fold back the center strip about a third of the way and the two outside strips, and lay another strip down, perpendicular.  Fold the three strips back.  You have finished half the pie.


4) Now do the same on the other side.  Fold back the center strips and two outside strips.  Lay the last strip down and fold the three strips back.  You are done with your lattice!  Take a second to admire your work.


5) Now, trim the strips and the first crust so that there is an even overlay of about 3 cm.  Fold and roll the crust outside, tucking it underneath the bottom crust, leaving a ridge of about a cm. Crimp the crust with your fingers, or use a fork to make a pattern.  Your pie is done!

If you want to gild the lily, you can brush the crust with a beaten egg, or a bit of cream so that it will bake up shiny and nice.  I had a bit of cream in the fridge, so that is what I used.  You can be happy with that, or you can sprinkle some sugar or nuts over the crust.  I was going to use rock sugar but I didn't have any at hand, so I decided upon some sliced almonds.


Put the pie in the oven and turn down the heat to 375F (190C).  Bake for 40 minutes  and then turn the pie around 180 degrees.  Bake for a further half an hour or until the filling is bubbling thickly in the center of the pie.  It can take up to an hour and a half in total, depending on your oven. Check to make sure it is not getting too brown on the crust, if so, shield it with a piece of tinfoil.  

Let cool, ideally for a few hours so that the filling has time to thicken.  Serve with vanilla icecream.


Monday, July 18, 2016

Gooseberry Fool with Pistachio Meringues

Browsing the shelves in the supermarket when I first moved to London for grad school, I was entranced by all the names of things unfamiliar: crumpets, double cream, golden syrup, scotch eggs, tinned rice pudding, hot cross buns...I wanted to try it all.  My gaze landed upon a little carton that looked like it might be yogurt.  It said "Gooseberry Fool."  What in the world was a fool?  What was a gooseberry?  I had to know.  Turns out a fool is bit of fluffy dessert goodness that melts in your mouth, creamy and tangy. I still wasn't sure what a gooseberry was, but I assumed it was, well, some kind of berry.

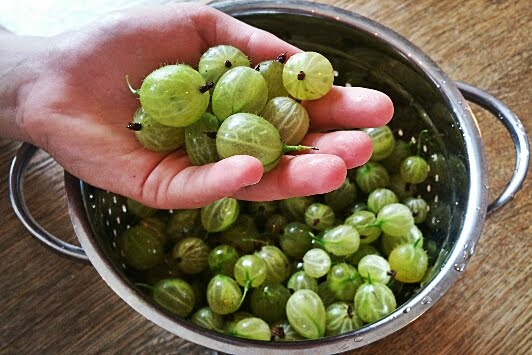
Fast forward a few years (ahem, many years) later, when we first bought our summer house here in Sweden.  Peter pounced upon a unassuming looking bush with glee!  "Great," he said, plucking some kind of fruit that looked like a strange veiny green marble. He popped it in his mouth and said, "Mmmmm...gooseberries are my favorite."  Aha!  So that is the elusive gooseberry.  Gustaf is also a big fan of the gooseberry and so all of our small crop is eaten every summer straight off the bush.

This summer, Gustaf said to me, "I found a big gooseberry bush.  It has big gooserries.  A lot of them."  I said, "show me."  We went to the bush.  This was a huge gooseberry bush.  The father of gooseberry bushes.  It was sporting the most enormous gooseberries that I had ever seen.  A few coming close to the size of a ping pong ball.  It was beautiful.  But there was a catch. Technically, it seemed to be in a field that belonged to noone.  But it was very near our neighbor's house.  And the only reason why it had been exposed is because the neighbor had mowed a path through the field from their house to the road.  Gustaf and I debated.  Can we take the berries?  We decided to keep an eye on them.  Once they were ripe, we would see if the neighbors picked them.  Last week, Gustaf reported in, "No one is picking the gooseberries."  Something had to be done.  I decided to take the initiative.  I walked up the path and went right up to my neighbor, Anna, who was standing on the porch and asked her whether she wanted the gooseberries.  She said that only her husband liked them and that we should take as much as we wanted!  Bingo!  She even lifted up the branches to help me pick. Thanks Anna!

I knew immediately what I wanted to make.  A fool.  This is a dessert with a long pedigree going back the 1500s.  Older recipes show it as a type of custard infused with fruit.  The modern recipe is a fruit puree folded into whipped cream.  Gooseberry is the classic fruit.  Its tart sweetness keeps the dessert from being cloying.

I decided to make some meringues to go with it, to add some texture and crunch.  I sprinkled the meringues with pistachio, mainly for the pretty green color which would echo the gooseberry.
This is how I did it.

For the meringues:
(Makes about 9 meringues)
4 egg whites
about a cup sugar
1 teaspoon vanilla
small handful pistachios, chopped finely

Beat the eggwhites on the highest speed until they form stiff peaks that do not fall down when you lift up the beaters.  Add the vanilla and then gradually add in the sugar.  Beat for a few minutes until the grains of sugar dissolve and become almost unnoticable in the eggwhites. The egg whites will become thick and glossy.

Preheat the oven to 100C.  On a baking sheet lined with parchment paper, divide the eggwhite mixture into 9 circle shaped balls.  Use a spoon to create some nice swirls in each pile and to pat the pile into a nice rounded shape.  Sprinkle the pistachio over each meringue. Bake in the oven for an hour to an hour and a half.  If you want them very dry, when they are done, turn off the heat and let them sit in the oven until it cools.  You can do this the night before and leave them in the oven overnight.

For the gooseberry fool:
(serves 6 to 8)
about 500 grams of fresh gooseberries
6 tablespoons sugar
300 ml Greek yogurt
300 ml whipping cream
one teaspoon vanilla
2 tablespoons powdered sugar

Make a gooseberry compote by putting the fresh gooseberries (topped and tailed) into a small pot on a medium high heat.  Add the sugar and stir.  Bring to a boil and cook about 10 minutes, stirring occassionally.  The gooseberries will pop and break down, but still have some chunks.  Taste and add more sugar if the gooseberries are very sour.  Set aside and let cool.  The compote will thicken as it cools.

When you are ready to serve, whip the cream to soft peaks. Add the powdered sugar, vanilla and yogurt.  Whisk together.  Taste to check the sugar.  It should just be barely sweet.

Take a bit more than half of the gooseberry compote and stir it into the cream and yogurt mixture.  Taste and add more compote, if desired.

To serve, pile a serving of the fool into a bowl.  Drizzle with the a spoonful of plain gooseberry compote and serve with a meringue.

If you have any compote leftover, it tastes lovely drizzled on some yogurt and topped with granola for breakfast or as a topping for pancakes or waffles.


Foraging: Meadowsweet (Älggräs) Cordial

A couple years ago, I had the pleasure of going to Fäviken, the celebrated restaurant in Northern Sweden near Åre, Sweden's largest ski resort. It was like entering into a winter fairy tale, walking from the candle lit pathway dug out of the snow into the sparsely decorated barn-like interior of the restaurant, where dried mushrooms were hanging, a fire burning, and a bear coat was casually hanging in a corner.  We had brought our two boys along with us and after we had sat us down, the attentive staff informed us that they had prepared a special non-alcoholic drinking menu for the boys.  For each course of the meal, they brought the boys a different drink and made them guess what was in the drink.  Many of the flavors we could guess and were familiar tasting.  But one was competely new to us.  A honey flowery scented drink.  It was delicious but elusive.  What could it be?  They told us it was flavored with meadowsweet, an herb.  I kept this nugget of knowledge in my brain, intending to look up the herb at some point....and this summer, many years after that beautiful Fäviken dinner, the nugget resurfaced and I looked it up.

The scientific name for Meadowsweet is Filipendula ulmaria. In Swedish it is called älggräs. The plant has small white flowers which have a strong distinctive smell like honey and almonds.  The leaves are also fragrant with a different sweet scent with a more grassy note.  The entire plant, incuding the root, has medicinal uses. It is mentioned by Chaucer and was a favorite of Queen Elizabeth I to strew in her apartments to keep them smelling sweet.  In the middle ages, it was often called meadwort because its flowers were used to flavor mead and is still used today to flavor beers.

Even more interesting, I found that meadowsweet had been used to make  aspirin!  Like willow, meadowsweet contains pain relieving compounds and in the 1800s, they experimented distilling the chemicals that relieve pain from the plant.  Bayer named this new compound "aspirin" after the old scientific name of meadowsweet which was then called spiraea ulmaria. Later scientists realized that that the drugs they had made from willow were the same as those from meadowsweet, namely salicylic acid.

I found that there are many recipes for meadsweet cordial, so I had to try it.  As has become my routine, I showed the picture of the plant to my son, Gustaf.  He said, "Oh yeah, that's everywhere."  I gave him a look which he understood to mean, "Get me some now".  He ran off and returned ten minutes later with a large handful of flowers.  I smelled them and compared them to the pictures, and voila!  I had meadowsweet.  I rushed to the kitchen and boiled up some sugar water and poured it over the flowers.  I tasted.  It was delicious.  The flavor was flowery and aromatic with very strong almond notes.  It had a slight bitter after taste.  After some research, I determined that this was due to the salicylic acid in the plant and could be minimized by stripping the flowers from the stems.

Yesterday, Gustaf and I went out with a basket and picked a huge bunch of flowers and made the cordial again.  In order to save a lot of work picking out the stems, I recomend that you strip the flowers off stems as you pick.  Even with beautiful bunches of de-stemmed flowers, the cordial may have a bitter after-taste, which you may or may not like, depending on your affinity to bitter flavors. The recipes that I found all instruct you to infuse the flowers overnight.  However, I noticed that immediately after infusing the flowers, the syrup tasted flavorful without any bitterness.  Half an hour later, the flavor was is much stronger but bitter tannin notes popped up.  The resulting drink, once diluted with water, only had mild tannin afternotes.  Even so the next time, I will only let it infuse for 10 minutes before straining out the flowers.   For the final cordial, I added citric acid to give it a sour refreshing taste.  The almond flavor of the flowers alone is lovely, but a little cloying. Many recipes use lemon for this.

The leaves of the meadowsweet plant also make a nice tissane.  I stripped off a couple of leaves and put them in a mug and poured boiling water over it.  After it had infused for two to three minues, I drank it.  It has a clean grassy flavor with a nutty overtone. 

Makes about 2 liters

about 20 handfuls of  de-stemmed meadowsweet flowers
2 liters water
2 kilograms sugar
60 grams citric acid
2 pinches sodium benzoate (2 mililiters)

In a large pot, put in the sugar and the water.  Bring the water to a boil and let cook until all the sugar is fully dissolved.  
Pick over the meadowsweet flowers, making sure you have as little stems as possible.  The stems and leaves of meadowsweet contain salicylic acid, which is a main component in aspirin.  While the amounts in the cordial are not enough to be really medicinal, the stems can make the drink bitter.
Once the sugar is dissolved, take the pot off the stove and add in the meadowsweet flowers, citric acid and the sodium benzoat and stir very well.  The citric acid will give it a pleasant sourness and complexity, which I think is refreshing against the honey almond flavor of the flowers.
The sodium benzoat is a preservative.  You can leave it out, if you like, but then you should either keep the finished saft in the refrigerator or freeze it.  If you do use the sodiumbenzoat, do NOT add it to the water while you are boiling it. This can make your saft very bitter flavored.
Stir the mixture and leave it to sit for 10 to 15 minutes. Strain out the flowers by pouring the mixture through a fine sieve.  I do it first through the finest colander I have, which takes away most of the flowers but leaves some petals.  Then I use a plastic and fabric coffee filter that I bought very cheaply to strain the rest.   Decant into clean, sterilized bottles.  If you have used the preservative, the cordial can stand in the cupboard.  If not, then keep it in the refrigerator or freeze it in baggies.

Note:  While I generally have made cordial and kept it in bottles at room temperature, just lately I have had problems with molding and yeasting.  I have gotten tired of throwing away gorgeous bottles of cordial away, so I have decided to store all my cordial now in the freezer.
To serve, add cold water or fizzy water to taste.  

Sunday, July 10, 2016

Foraging: Lambs Quarters (Svinmålla)

Of the many things that I love about Sweden, foraging for edibles ranks on top.  Unlike in the USA, at least where I have lived, the Swedes still maintain bonded to the land and old traditions still live.  Many Swedes have a country home, usually a simple cottage near a lake or in the forest, where they retreat for the holidays.  It is typical to see Swedes hanging out their laundry in the countryside and picking wild flowers in the fields.

Picking mushrooms and wild berries is a favorite activity, beloved by most. There is a satisfaction in the hunt.  An excitement as to what you might find, whether you will return home with your basket empty or full of edible treasure.

Another very typical country activity is making "saft" or cordial during the summer, with whatever might be available in your garden.  Most country houses have a few currant bushes and perhaps a rhubarb plant or gooseberry.  Elderflower trees grow everywhere and elderflower cordial made from the flowers is a traditional marker of summer.

This summer, I found a website called Dags att Plocka (Time to Pick) which will send you a weekly newsletter on what is ready to be foraged.  This week's newsletter discussed a common weed called Lamb's Quarter or Svinmålla, in Swedish.  The Latin name is Chenopodium album.  The newletter intrigued me.  Lamb's quarters were commonly used as a main food item in the middle ages but spinach gradually replaced it.  Lamb's quarter is very nutrious, a good source of vitamins A and C.  It said that in India and other countries, the plant, called bathua, is still cultivated for food and used in curries.  I had to try it.

My son and I went out in the fields nearest to our house to have a look.  We found a plant that looked similar, but we weren't sure because the leaves weren't exactly the same as in the photographs. I showed a picture to my husband.  He said that the last time his father had been to visit us, he had pointed out a whole field of lamb's quarter.  His father had mentioned that it was edible. Eureka! This morning he went out and picked me a basket. Tonight I cooked it for dinner.  It was delicious.  It tastes like a mild spinach.  In fact, if you ate it without knowing what it was, you would think it was spinach.

The plant is quite distinctive because of the shape of the leaves. The entire plant is edible, including the seeds, which are a relation of the very fashionable quinoa.  You can use it in the same manner as you would use spinach.  For dinner, I briefly blanched it with a bit of boiling water, and then I sauteed it with garlic and olive oil. Tommorrow, I plan to use the leftovers in a omelette.  I won't be buying spinach again here in the summer! Why would I when I can have lamb's quarter, fresh, delicious, and free?

Friday, July 01, 2016

Warm Glass Noodles, Eggplant and Soybeans

I have a crush on Yotam Ottolenghi.  I just bought his cookbook Plenty and I would like to eat every recipe. Today I tried one of his recipes for dinner: Warm glass noodles and edamame beans. Unfortunately I couldn't get some of the more exotic ingredients like tamarind paste and palm sugar, so I substitued items that I could get easily at the grocery store here in Sweden.  If you can get those items, then by all means, try the orginal sauce recipe but my sauce turned out delicious.  Among other things, I added fish sauce and a dash of HP sauce to give some depth.  Yes, HP sauce.  I know it sounds weird but it has a sweet/sour taste which I thought would mimic the missing tamarind. I also decided to throw in some eggplant to give the dish a bit more heft and because they looked so beautiful at the store.

I will be frank, this recipe, does require a lot of chopping and prep work for each ingredient.  Nothing is difficult and I actually enjoy working with these lovely ingredients.  The smell as you chop, grate, and juice are divine.  If you wanted to do this for a party, you could prep everything in advance and just fry up the noodles and warm everything through right before serving.

We ate this dish for dinner as the main and only course.  But it would be fabulous with some grilled chicken or pork, particularly if you brush some sweet soysauce on the meat before you grill. 


Serves 4
200 grams glass noodles
4 to 6 garlic cloves
1 box frozen soy beans, also called edamame (200 grams)
2 medium firm eggplants (aubergine)
4 spring onions
1 red chili (optional, chopped finely)
one bunch fresh corriander (about 3 tablespoons chopped)
one bunch fresh mint (about 3 tablespoons chopped)
one bunch fresh basil (about 3 tablespoons chopped)
3 tablespoons sesame seeds
olive oil

Sauce
1 to 2 tablespoons grated fresh ginger
juice of 4 limes
3 tablespoons olive oil
1 tablespoon soy sauce
1 tablespoon fish sauce
1 tablespoon HP sauce
2 to 3 tablespoons brown sugar
1 teaspoon fine salt

First, make the sauce.  Grate the ginger on the finest setting on your grater.  It will shred and form a pulp.  Juice the limes.  Mix the ginger, lime and all the other ingredients in a small bowl.  Stir and taste.  Adjust the sweetness to your liking.  You can add a bit more ginger or lime juice if you like.

Prepare the soybeans according to the instructions on the box, i.e. pour boiling water on the soybeans and a bit of salt in a small pot and bring the water back to boil on the stovetop.  Let the soybeans cook for 2 minutes then strain.  Set the soybeans aside.

Toast the sesame seeds by putting a pan onto the highest heat.  Pour the seeds in the pan and stir now and then, watching the whole time.  After a bit, you will see the oil coming out of the seeds.  When this starts to happen, stir often and shake the pan to move around the seeds.  Toast the seeds until they become golden.  Be careful as they easily burn.  Pour the seeds into a bowl and set aside.

Prepare the glass noodles according to the instructions on the packet, i.e. put the noodles into a bowl.  Pour boiling water over the noodles.  Put a lid on the bowl.  Let sit for 2 to 5 minutes (depending on what it says on the packet), then drain in a colander. Set noodles aside.  Don't worry that the noodles clump together. They will separate later in the sauce.

Chop all the herbs, chili, and the spring onions finely.  Set aside.  

Chop the aubergine into nice bite sized pieces.  In a frying pan on medium high heat, pour in a generous splash of olive oil.  When hot, pour in the aubergine, as many as will fit in one layer on the bottom of the pan.  Sprinkle with a bit of salt and toss to cover each piece in oil.  Fry until golden brown and tender, tossing frequently. Fry the remaining egg plant in batches in the same manner.  Set aside.

Take each garlic clove and semi-gently smash it with a knife.  Peel off the skin.  

Line up all your ingredients next to the stove and put out a large bowl or platter to hold the final dish.  

Put two tablespoons olive oil in a medium hot pan.  Throw in the garlic.  Fry the garlic, turning frequently until it is nice and golden. Do not let the garlic burn or it will become bitter. Throw the noodles over the oil and then pour in the sauce.  Toss the noodles with tongs until the sauce fully coats all the noodles.  Throw on the soybeans and eggplant and toss until everything is heated through.

Pour the noodles onto your serving dish.  Sprinkle with herbs, spring onion, and sesame seeds.  Toss again with the tongs and serve warm.  Leftovers would probably taste great cold but I have never had any...


Tuesday, June 28, 2016

Paris, crêpes, and Mary

The family and I went to Paris to start out our summer vacation this year.  It was really fun to see Paris through the kids' eyes and to have an excuse to be a tourist.  The kids loved the Louvre and Eiffel Tower and even wanted to climb up the Arc de Triomph. They were unimpressed with the beauty of the avenues and prefered to sleep in taxis rather than admire the view.  They did not want to sit in a cafe all day (what?!) but loved the food markets, fresh crusty baguettes and eating Vietnamese pho noodles for the first time.  And as all good tourists do, we had several crêpes for snacks in between seeing sites. 
Which led us to understand that we really needed a râteau en bois to take home.  Yes, that's right.  A 
wooden crêpe batter spreader thingy. The ultimate Paris souvenir. You heard it here first folks!

Mary and I cooking together.
So, today we tried making crêpe with our rateau.  The recipe I use now is from my friend Mary, so I always think of her whenever I make crêpes.  Mary was an amazing cook and the last time I saw her, we made a huge pile of crêpes together for a party.  We made the crêpes in advance during the day.  To serve, we just reheated them in the oven, wrapped in foil.  We had a big bowl of whipped cream, another huge bowl of berries, and some chocolate sauce. Guests filled their own crêpe and we had a long line of very happy customers.  I am so privileged that my last memory of Mary was such a happy one, full of laughter and good food.  I think Mary would have approved of the râteau.  She probably would have been better at using it than me!
To be honest, it wasn't that much easier to use the râteau than to just swirl the batter in the pan. It takes a light touch on the rateau not to tear the delicate batter and it took a few tries before we managed to make a good looking crêpe.  The main thing that is better with the râteau is that you don't have to be in such a hurry, like you do when you swirl the batter.  In fact, you need to wait a few seconds after you have poured in the batter before you spread it with the râteau. So the process is a bit calmer.  Whether you decide to swirl or use a râteau, the crêpes will taste good all the same!

You can put almost anything on your crêpes.  My personal favorite is the simplest, just a sprinkle of sugar and lemon onto the hot crepe.


Mary's Cr
êpe Recipe
Makes  about 10 crêpes:
1 cup all-purpose flour
1 tbsp sugar
1/4 tsp salt
1 cup milk
1/3 cup water
3 eggs
3 tbsps butter, melted

1.       Combine the flour, sugar, and salt in a food processor and process briefly.
2.       With the motor running, add the milk, water, and eggs,  through the feed tube.  Process until smooth.  Alternatively, you can beat the batter with a whisk by hand.
3. Pour the batter into a bowl and then add the melted butter slowly, whisking all the time.
3.       Heat a heavy 7-inch nonstick skillet (mine is a 9-inch) until quite hot.  Pour in 3 tbsps (I use a 1/4 cup) of the batter, then quickly tilt the pan so the batter spreads evenly, forming a crepe.  
4.  If using a râteau, pour in the batter in the center of the pan.  Wait a few seconds and then gently use the rateau to swirl the batter around to the edges of the pan.
5. Cook until lightly brown, 30 to 45 seconds; then turn and cook another 15 seconds.
6.       Repeat, using up all the batter.  As you finish the crêpe, stack them between sheets of waxed paper to prevent them from sticking or serve them at once, hot from the pan.  If making crêpes for later, wrap the stacked crêpes in plastic wrap.  They will keep in the refrigerator for 2 days.  To re-heat, simply wrap them in foil and heat them in the oven. 


Monday, June 27, 2016

Swedish Oatmeal Cookies (Havrekakor)

This is a family favorite and a quintessential Swedish cookie.  They have become a specialty of my son Oscar who made his first pocket money by baking a few batches, packing them into little bags and selling them around the neighborhood on his bicycle.
They are simple to make and irresistible, being neither too rich nor too sweet.  Unlike American oatmeal cookies, these are light and crunchy.  A batch of these cookies are easily eaten in a day, okay, in an hour, by my family!

About 40 small cookies

250 grams butter
3 dl sugar
1 egg
2 teaspoons baking powder
1 ½ dl oatmeal
2 dl raisins
5 dl flour


Heat the oven to 200 C or 400F .  
Cream the butter in a large bowl with an electric mixer until it is light and fluffy.  Add the eggs and the baking powder and continue to mix a further two minutes.  Add in the flour and sugar bit by bit until it is just combined.  Finally, add the raisins and oatmeal and combine with a wooden spoon. 

Line a baking sheet with parchment paper and measure out heaping teaspoons of dough, leaving about 2 inches between each cookie to allow them to spread.  Bake in the oven for about 8 minutes until golden.